DOM 计算属性
在这里分类总结一些常用的计算元素几何位置的属性和方法,包括了HTMLElement 、Intersection Observer、window、scroll
DOM 几何位置相关计算属性和方法
一、HTMLElement 相关
提示
注意:如果元素被隐藏(例如 元素或者元素的祖先之一的元素的 style.display 被设置为 none),则返回 0
1.1 元素自身宽高
HTMLElement.offsetHeight,元素自身可视高度加上上下 border 的高度
HTMLElement.offsetWidth,元素自身可视宽度加上左右 border 的宽度
1.2 元素相对位置
HTMLElement.offsetLeft,元素自己 border 左边距离父元素 border 左边或者 body 元素 border 左边的距离
HTMLElement.offsetTop,元素自己 border 顶部距离父元素顶部或者 body 元素 border 顶部的距离
getBoundingClientRect(),方法返回一个 DOMRect 对象,提供有关元素大小及其相对于视口的位置。

const rect = element.getBoundingClientRect();
const top = rect.top;
const bottom = rect.bottom;
const height = rect.height;
补充:HTMLElement.offsetParent,获取元素的父元素,如果没有就是 body 元素
https://developer.mozilla.org/zh-CN/docs/Web/API/HTMLElement
Viewport 视口表示当前正在查看的计算机图形中的多边形(通常为矩形)区域。在 Web 浏览器术语中,它是指您正在查看的文档部分,该部分当前在其窗口中可见(如果文档以全屏模式查看,则为屏幕)。视口外的内容在滚动到视图中之前不会在屏幕上显示。 视区中当前可见的部分称为可视视区。这可以小于布局视口,例如当用户进行捏合缩放时。布局视口保持不变,但可视视口变小。
二、Window 相关
窗口大小
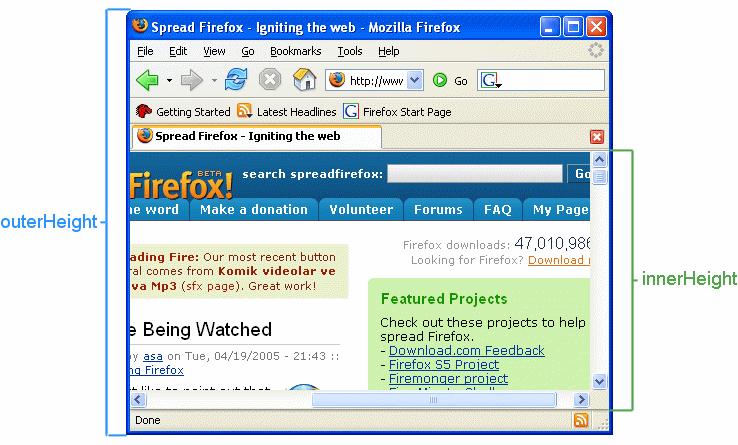
Window.outerHeight,返回整个浏览器窗口的高度(以像素为单位),包括侧边栏(如果存在)、窗口镶边(window chrome)和窗口调正边框(window resizing border/handle)。
Window.outerWidth,获取浏览器窗口外部的宽度。表示整个浏览器窗口的宽度,包括侧边栏(如果存在)、窗口镶边(window chrome)和调正窗口大小的边框(window resizing borders/handles)。
Window.innerHeight,浏览器窗口的 视口(viewport) 高度(以像素为单位);如果有水平滚动条,也包括滚动条高度。
Window.innerWidth,返回以像素为单位的窗口的内部宽度。如果垂直滚动条存在,则这个属性将包括它的宽度。
三、Scroll 相关计算
3.1 相对窗口的滚动计算
Window.scrollX,返回文档/页面水平方向滚动的像素值。
Window.scrollY,返回文档在垂直方向已滚动的像素值。
提示
注意还有个别名,Window.pageXOffset 和 Window.pageYOffset
3.2 相对某个元素的滚动计算
一个页面里面可以会有多个滚动条,多出现在某个元素属性设置了 固定高度 和 overflow:auto 等属性
Element.scrollTop,获取或设置元素内容垂直滚动的像素数
Element.scrollWidth 只读属性,测量元素内容的宽度,包括由于溢出屏幕部分。
四、Intersection Observer Api
以往实现通常是监听滚动事件和getBoundingClientRect()方法来实现的,当页面滚动时,计算函数会被频繁调用,会影响网站的性能。 需要尽可能减少不必要的计算和操作。可以考虑使用节流函数来限制函数的调用频率。
https://developer.mozilla.org/en-US/docs/Web/API/Intersection_Observer_API
一种新的浏览器API,它可以异步观察目标元素与其祖先元素或顶级文档视窗之间的交叉状态。 使用该API可以轻松实现懒加载图片,只需要监听目标元素与视窗的交叉状态即可。
4.1 基本使用
调用 IntersectionObserver(cb,{})构造函数返回一个新的 IntersectionObserver 对象
该构造函数接收两个参数,分别是满足条件时触发的回调函数CB和配置项对象
回调函数的第一个参数为 entries ,是一个数组包含了所有被观察元素的观察信息。每个观察信息都是一个IntersectionObserverEntry对象, 其中包含了目标元素的信息以及与视窗的交叉信息。 entries 内的元素是通过方法 observe 手动添加的。如下:
const intersectionObserver = new IntersectionObserver((entries) => {
// 如果 intersectionRatio 为 0,则目标在视野外,
// 我们不需要做任何事情。
if (entries[0].intersectionRatio <= 0) return;

loadItems(10);
console.log('Loaded new items');
});
// 开始监听
intersectionObserver.observe(document.querySelector('.scrollerFooter'));
相关信息
对于每个被观察的元素,都会有一个对应的IntersectionObserverEntry对象(entries里的元素)。这个对象包含了以下属性:
- target:被观察的元素。
- boundingClientRect:被观察元素的矩形区域的信息,包括位置、尺寸等。
- intersectionRect:被观察元素与视窗的交叉区域的信息,包括位置、尺寸等。
- intersectionRatio:被观察元素与视窗的交叉比例,取值范围为0到1,表示元素的多少部分在视窗中可见。
- isIntersecting:表示被观察元素是否与视窗相交,取值为true或false。
配置对象里面可以设置
{ root: null, // 默认为视窗 rootMargin: '0px', // 边距 threshold: 1.0 // 阈值 }
在上面的示例中,root设置为null表示默认为视窗,rootMargin设置为'0px'表示边距为0(默认也是0), threshold设置为1.0(默认为0)表示当目标元素全部进入视窗时触发回调函数。
提示
rootMargin 的作用 计算交叉时添加到根边界盒 (en-US)的矩形偏移量,可以有效的缩小或扩大根的判定范围从而满足计算需要。
4.2 示例
监听多个元素
<!DOCTYPE html>
<html>
<head>
  <meta charset="UTF-8">
  <title>IntersectionObserver Example</title>
  <style>
    .box {
      width: 200px;
      height: 200px;
      background-color: #ccc;
      margin: 1000px 0;
    }
  </style>
</head>
<body>
  <div class="box"></div>
  <script>
    const box = document.querySelector('.box');
    const observer = new IntersectionObserver(entries => {
      if (entries[0].isIntersecting) {
        box.textContent = 'Hello World!';
      }
    }, {
      root: null, // 默认为视窗
      rootMargin: '0px', // 边距
      threshold: 1.0 // 阈值
    });
    observer.observe(box);
  </script>
</body>
</html>
4.3 补充
提示
在使用IntersectionObserver时,记得对其进行销毁处理,以避免在组件卸载后产生不必要的触发和内存泄漏。
在组件卸载时调用对应的方法 IntersectionObserver.disconnect() 使得对象停止监听
针对已经出现在视口的元素,可以使用 IntersectionObserver.unobserve(element)的方式使得对象停止对该元素监听
五、应用
5.1 图片懒加载
以前的方式是监听滚动事件和结合元素的getBoundingClientRect()方法和Window.innerHeight来判断是否出现在视口。 (top>0 && top<window.innerHeight)。这种方法还需要考虑节流来避免大量的浏览器计算
在这里主要是讲解新方法,使用IntersectionObserver实现图片懒加载,即在图片进入视窗时再加载图片,从而减少页面的加载时间和网络请求
<!DOCTYPE html>
<html>
<head>
  <meta charset="UTF-8">
  <title>IntersectionObserver Example</title>
  <style>
    .box {
      width: 200px;
      height: 200px;
      background-color: #ccc;
      margin: 1000px 0;
    }
    .image {
      width: 100%;
      height: 100%;
      object-fit: cover;
    }
  </style>
</head>
<body>
  <div class="box"></div>
  <img class="image" src="loading.gif" data-src="image.jpg">
  <div class="box"></div>
  <img class="image" src="loading.gif" data-src="image2.jpg">
  <div class="box"></div>
  <img class="image" src="loading.gif" data-src="image3.jpg">
  <div class="box"></div>
  <script>
    const images = document.querySelectorAll('image');
    const intersectionObserver = new IntersectionObserver((entries)=>{
          // 为每一个监听的元素设置事件
        entries.forEach((entry)=>{
            if(entry.isIntersecting){
                // entry.target 获得目标HtmlElment
                let src = entry.target.getAttribute('data-src');
                entry.target.setAttribute('src',src);
                // 出现过的图片便取消监听
                intersectionObserver.unobserve(entry.target);
            }
        })
    })
      // 给 intersectionObserver 添加需要监听的元素
      images.forEach((image)=>{
          intersectionObserver.observe(image);
      })
  </script>
</body>
</html>
5.2 列表触底加载数据
这里使用react来实现,主要思路就是在列表底部放一个元素用来监听,如果这个元素出现在了视口,那么就更新数据
import React, { useState, useEffect, useRef } from 'react';

function List() {
  const [items, setItems] = useState([]);
  const [page, setPage] = useState(1);
  const bottomRef = useRef(null);

  useEffect(() => {
    fetch(`api?page=${page}`)
      .then(response => response.json())
      .then(data => setItems(prevItems => [...prevItems, ...data]));
  }, [page]);

  useEffect(() => {
    const observer = new IntersectionObserver(entries => {
      if (entries[0].isIntersecting) {
        setPage(prevPage => prevPage + 1);
      }
    }, { threshold: 1 });
    observer.observe(bottomRef.current);
    // 当组件卸载时进行销毁,以免内存泄漏
    return () => {
      observer.disconnect();
    };
  }, []);

  return (
    <div>
      {items.map(item => (
        <div key={item.id}>{item.title}</div>
      ))}
      <div ref={bottomRef}></div>
    </div>
  );
}